DIY Polymer Clay Ring Bowls
This post may contain Amazon or other affiliate links. As an Amazon Associate I earn from qualifying purchases.
These DIY Polymer Clay Ring Bowls are fun to make and a great little diy gift to share too.
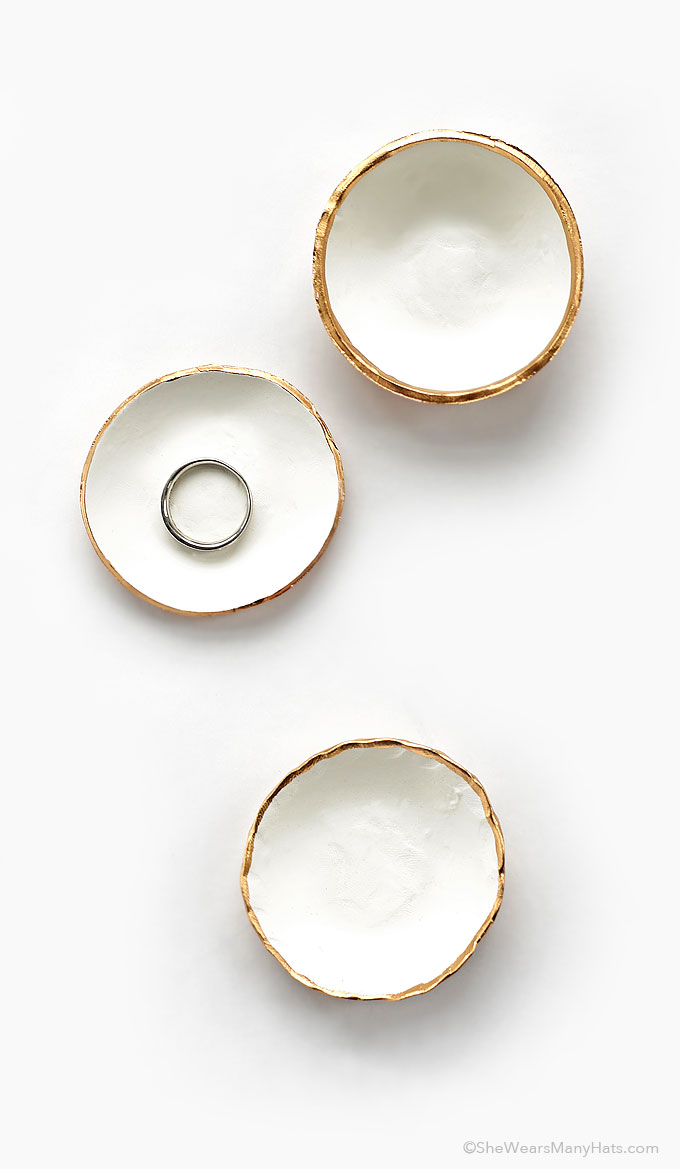
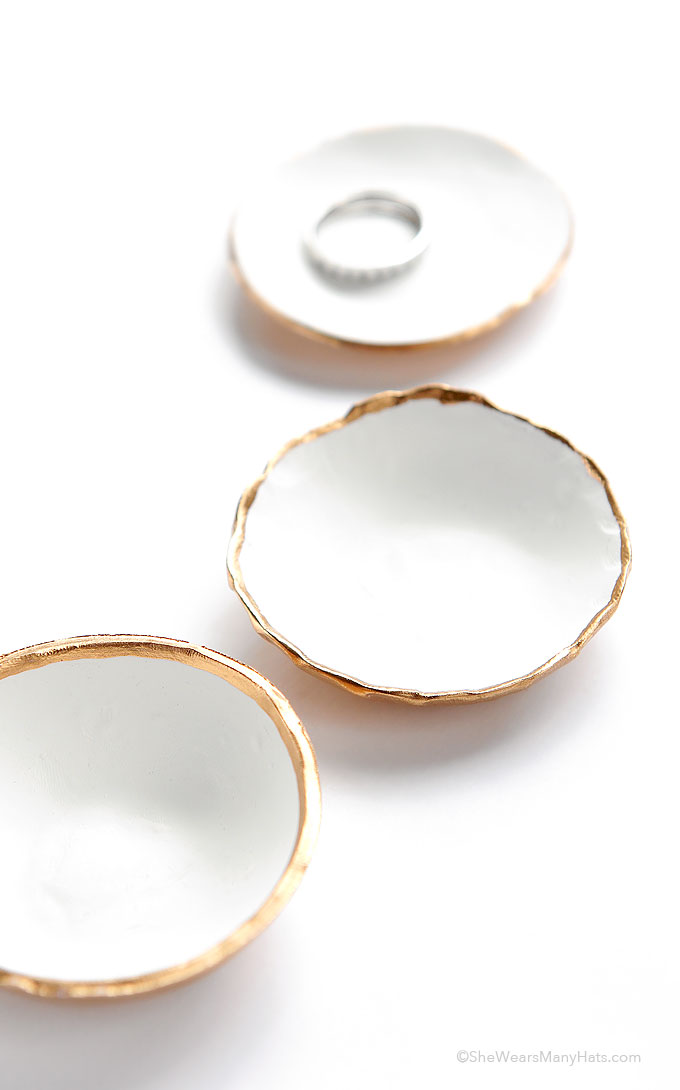
I’ve grown rather smitten with the polymer clay. Last week it was the easy Christmas Ornaments, this week it is little bowls, or ring bowls, or ring dishes … whatever you’d like to call them is fine with me. Just like the ornaments, they are so simple to make and require just about the same list of supplies and technique. Cute polymer clay bowls would make a great gift for anyone to use as a place to hold rings, loose change, or any small things that need a special place. These little bowls can be personalized by adding initials with an alphabet stamp (see the ornament post for details on that), and/or painted with accents. I used white polymer clay for these, but polymer clay is available in a huge array of colors which can be used in combination with one another to create fun swirls and patterns. For these small ring bowls I kept it simple with white clay accented with a gold edge.

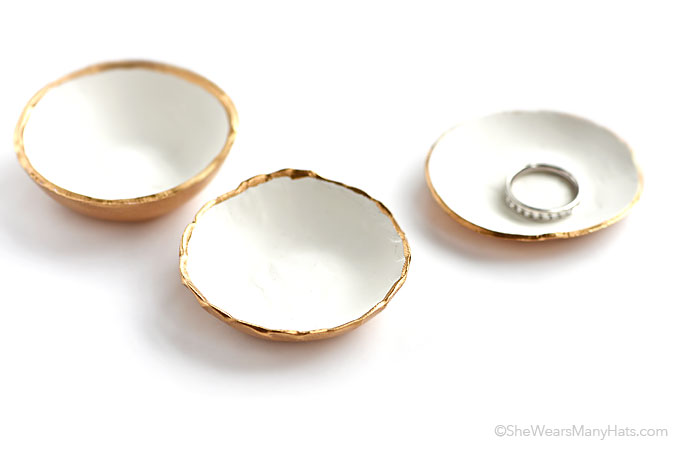
I formed some of the bowls by hand, simply pressing and turning up the edges, while others were made by pressing the cut out clay circle into a small glass bowl to create the shape. Even though I like how they all turned out, the organic or rustic irregular shaped bowls are my favorite. Basic circles were used for the bowls shown, but I did have fun making some with scalloped edged cookie cutters too, as well as some square cookie cutters to make a few square shaped bowls. Be creative! Make whatever size and shape you want, and if you don’t like it, ball up the clay and start over. Polymer clay is very forgiving like that.
Supplies needed to make polymer clay ring bowls:
- baking pan
- baking parchment or aluminum foil
- polymer clay (like Sculpey III)
- a smooth/flat surface to work on
- rolling pin (or something that could double as a rolling pin like a glass or vase)
- cookie cutter(s)
- optional: mini alphabet stamps*
- optional: small glass bowls for shaping desired finished size/shape
- paintbrush
- gold leaf paint or other acrylic paint colors
(I purchased this set, which includes the circle cookie cutter and alphabet stamps, along with some other fun tools: Walnut Hollow Clay Embossing Set)
How to make a polymer clay bowl:
- Preheat oven to polymer clay instructions. (If using Sculpey III that would be 275-degrees F.) Line baking pan with parchment paper or aluminum foil.
- Begin by softening up the clay by kneading it in your hands until it’s pliable and easy to work with.
- Next, using the rolling pin, flatten out the clay to abut 1/8-inch (or desired thickness) on a smooth flat surface.
- Cut circles (or squares) out of flattened clay with cookie cutter.
- optional: If letters are desired, using mini alphabet stamps, press letters of choice into center of circle (or square).
- Form the desired bowl shape by hand or gently place the cut out clay shape into the center of another glass bowl, and gently press to form ring bowl shape. Carefully lift clay bowl out of glass bowl.
- Place prepared clay bowls onto lined baking pan. Bake according to polymer clay instructions. (If using Sculpey III, bake for15 minutes for 1/4-inch or less.) Remove from oven and allow to cool.
- Once cool, paint as desired. Allow paint to dry.
That’s it! See how easy that is? Now you’re all ready to be the next great ring bowl maker. I do hope you enjoy this project as much as I have.


I just recently bought a bunch of polymer clay to play with. I have the perfect color to make these!
You are so clever Amy Johnson. I love these. What a beautiful little stocking stuffer they would make. Thanks for this great idea.
Not as clever as you, my friend. 😉 They would make a great stocking stuffer! So easy and on the cheap too.
I’m looking forward to trying other colors soon. Have fun crafting!
Oh how dear are these! Love them Amy! Thanks for sharing!
I can see you and your girls making some very chic versions of these!
My questions is, how do you keep them from sticking to the surface you roll them put on? That is the trouble we have here when making gifts with my children. Thanks for any advice.
Gently pull them off of surface, or use a thin index card like a spatula to lift it off. If you are working on a small silicone mat, you can flip it over and peel the mat off of the clay. You can also try rolling it out on wax paper to see if that helps. The ones shown here stuck just a bit but I gently lifted an edge and they were easy to lift off.
just discovered! love!love!love! can’t wait to get started! many thanks!
Hi Amy, I just came across this DIY and it’s exactly what I was looking for to make for a newly married friend for a Christmas gift. My bowl just came out of the oven! I have a question I hope you can answer, and I realize this project is a year old so I hope you’ll remember 🙂 Did you apply any kind of sealant to the bowls before or after the gold gilding? And this is my first time working with Sculpey so I’ve only just learned that my bowls will remain somewhat flimsy. I’m wondering if there is any way to stiffen them up so to speak. Any help you can provide is much appreciated. Thank you!
I did not apply a sealant. The finished bowl wasn’t too bendy. I wonder if it depends on what Sculpey is used? I know there is more than one kind.
omg love! What type of paint do you use? I wouldn’t want to ruin it 🙁
Hello Annabelle, I used the brand of paint linked in the article above. It is made by Plaid and comes in a small jar. Whatever you choose to use, read the label to see what it says about types of surfaces to use it on.
Can you advise approximately how many ounces of polymer clay per bowl? I need to make 16!!
Kristin, I’m so sorry. I do not know how many ounces per bowl as I made different sizes and styles.
Kristen – I’ve made similar bowls (about 3 1/2″ diameter) around 1/8″+ thick and used slightly less than a 1 oz. brick for each. I was using Sculpey III, not that brand matters in this regard, but it’s not my favorite (it was VERY soft when trying to make earrings, I had to refrigerate it to work with it and it was ok, but I wouldn’t buy it again) – I’m going to try Premo by Sculpey or Fimo next time…just FYI in case you haven’t bought your supplies yet.
Thank you so much for sharing that information, Amanda! 🙂
I also baked mine on an inverted bowl so they would retain their shape – I didn’t trust that the clay would hold up after softening in the oven. It seems like it worked for Amy without this step (and it looks like she was also using Sculpey III) though.
Mine got flat.
Hello, loved this idea! Unfortunately, the type of gold foil paint you are using will make the polymer clay very sticky where applied (no matter if you apply it before or after baking – just figured this out!)…. After much research – and a total batch of these thrown in the trash! – I found that it’s incompatible with polymer clay, no matter what brand you use. Such a bummer! However, there are acrylic gold metallic paints that apparently will work (here is a link to someone who tested them: http://thebluebottletree.com/testing-metallic-paints-polymer-clay/). Off to Hobby Lobby again to find something I like!
Hey there! These bowls are lovely! I was wondering if you would be okay with my selling the bowls I make on etsy or to friends just to make some pocket money. My bowls would have different design than yours. If I am not allowed to sell them, that is totally understandable. Thank you for your time!
I’m hoping you reply since this is a older post! I saw on someone else’s comment that you said you did not use a sealant or glaze to finish the bowls. Yours look so shiny, mine look so dull (except for where the gold paint is, that’s nice and sparkly). Is there any shiny glaze you could recommend for sculpt 3? Thanks so much, I am so excited to make these for all the ladies in my life for Christmas gifts!
I do not have one that I recommend. I would look on Sculpey’s site for what they recommended.
is there a way to make these food safe?
I would not recommend using polymer clay for anything with food.
I made one for my daughter and she wants to use it for her sage smudge! Would this harm the dish? I put several coats of glaze on the dish!
I have no idea. I’ve never burned anything in one before.